Showing posts with label DIY. Show all posts

Friday, January 27, 2012

Ball Mason Jar Drink Dispenser

So there I was...pinning, and pinning, and pinning...and then! I saw it! Not just a Mason Jar (which I love so much I have dedicated a board just to all things Mason Jar....titled "Mason Jar Love.")
I'm so obvious right?!

So I repinned it of course...

 
and followed the link to check out the price.


$69!!!! hahaaaaa, you gotta be kidding me!
Seriously, I am cheap like that.

Plus I thought for a hot second before I realized...Wait a minute...I can make that!

I knew that Hobby Lobby sold oversized Ball Mason Jars...oh, and I had a 50% off coupon that I found online the other day. I searched the internet for spigots to put on the jar I would buy from Hobby Lobby...$15...$18...$20!! No thanks. I could always find a cheap glass drink dispenser and take the spigot from it...Yeah. That's the plan.

So, Friday rolled around...my project day. I went to Hobby Lobby...happily picked up my oversized Mason jar...(half off, thank you very much.) Then as I head up to check out I saw a tall apothecary jar drink dispenser...$30.00...darn it. I had a 40% off coupon on my phone, but even that would only be like $20 after the coupon. Still not cheap enough. So I gave up, and decided to head over to HomeGoods to see what they had. I might get lucky. But I didn't, they had nothing.

So then I head over to Goodwill...walked around for about 5 minutes...then I saw it. Would you believe that I found the very apothecary jar that Hobby Lobby was selling for $30...for $4!!! YES!!! $4!!!! I had to laugh at myself a little, because just a week ago I was laughing to my Mom about how I saw a lady on HGTV who found exactly what she was looking for at a thrift store. What were the chances I thought! Well, obviously...the chances were pretty good...and I was SURELY in luck!

So I headed home, and after a few youtube videos on gutting glass, and some help from Husby to find the right Dremel tools...I was in business.

Here's a little video fun...how the project went down!


And a few photos of the finished product!


Enjoy! And be sure to click here ---->  Pin It


I would love to see other projects like this!! :)


Friday, April 08, 2011

A little vinyl action…

What’s this? She’s blogging?! Oh yes, that’s right friends I am back. At least for now. I did get halfway through my first vinyl project before I realized it would be the perfect thing to blog about. So, pardon my jump into the middle of this Day O’ Vinyl Projects. : )

So first thing, I created a vinyl expression for Husby. He wanted the front door to say “Win the Day.” He had been wanting the perfect saying or quote to go over our front door, to serve as a reminder and encouragement before each of our days. He searched and searched and finally came across the perfect saying. Read more about it here: Win the Day. Of course it would have some relation to sports as well; but I could let that slide.

Here are a few photos of Husby putting the expression on the wall. It was his first time and he did a great job!

Vinyl_1                   Vinyl_3 Vinyl_2Vinyl_4

I can’t figure out why I look like I write like a 6 year old on my bamboo pad. stink.

Anywho. I think it looks lovely…the vinyl expression that is!! More photos to come!!!

Thursday, March 03, 2011

Cabinet Door RE-Do–Trash to Pleasure

image

Remember when I found the free cabinet doors on the side of the road? Well I had plenty of ideas on how to use them but I had never touched them since we loaded them in the attic almost a year ago. Until a friends birthday approached and I saw an idea online that led me back to them.

image

I didn’t have any cool tables like that lying around, but I did have a few cabinet doors…and an idea of a serving tray from an old cabinet door…

image

So I set my goal and got started. I remembered back to a school project in middle school where I died paper with tea bags, baked  them and burned edges, etc. to make the paper look aged. Here’s a quick how to for that: You’ll need tea bags, (any will do) a cup of water, a cookie sheet and your paper. For my project I printed out the Hymn sheet music to my Friends favorite Praise and Worship song.

IMG_5600

Preheat your oven anywhere from 100-175 degrees.

IMG_5606

Soak the tea bag and squeeze it over the paper, occasionally rubbing it into the paper. If some of the tea spills out it’s ok, it will add to the look.

IMG_5603

I laid each page on a towel, to decrease the opportunity for a huge mess! :)

IMG_5605

Some pages I crinkled and allowed the tea to pool in areas to make darker stains.

IMG_5607

I allowed them to dry a little, then I put each into the oven for 3-5 minutes until they were just about dry. Then I took a candle and held the pages over the flame to get small burn marks and to burn the edges.

IMG_5611

Once I was done, I laid out the pages some I ripped, others full pages onto the cabinet door. I coated the door with modge podge and began to press the pages onto the cabinet door, especially in the dipped area.

IMG_5614

Then I coated the top with modge podge (two layers) and let it dry over night.

IMG_5617

Once it dried…Oh I had already fallen in love with it. Husby helped me to attach the handles I got 50% off at Hobby Lobby (total of $2.00).

IMG_5618

Here’s the best finished picture I have. Sorry I didn’t think to take a better one, but I LOVE the final result!! Good thing is, my friend loved it too!! I plan to make a few more, for other friends as well…trust me, there is no shortage of cabinet doors in our attic!

IMG_5623

It was a great little project, not too hard…thoughts? I LOVE it :)

Pin It

Tuesday, March 01, 2011

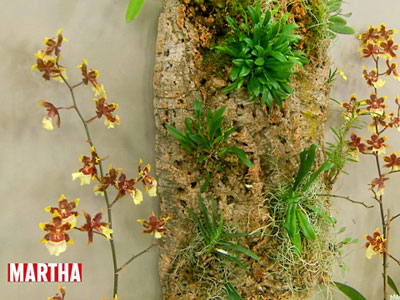
Air Plants and Mini Orchids

I might admit that I have become a little cocky when it comes to my Orchid. It's been alive and thriving for nearly two months and I am ready to step up my game in the indoor house plants arena, it's really making me look forward to spring!

So today I've done a little research and here's what I'm lovin'...

Air Plants


Air plants are described as "An epiphyte is a plant that grows upon another plant (such as a tree) non-parasitically or sometimes upon some other object deriving its moisture and nutrients from the air and rain and sometimes from debris accumulating around it.

Caring for them seems fairly easy: They grow differently than most other house plants, and it may be confusing to the beginner. They are really very hardy, and require much less attention than other house plants.

Protect them from frosts.
Most prefer cool night temperatures - below 60 degrees if it can be provided.
Give them bright, filtered light.
Provided the atmosphere is not too dry (as in an air-conditioned home) they require relatively little watering.
If you are growing them indoors and the air is dry, you will need to submerge the plant in water for 2-3 hours about every two weeks. Otherwise, in a shade-house or unheated home, you can use a soaking mist once or twice a week in summer, once a month in cooler weather.

Not too bad, and they are super neat little plants.

Obviously, I love orchids too. They are so beautiful and dainty, just begging for extra special care; and mini orchids have caught my eye!

Orchids

(You can watch the video of how this wall hanging was made here.)

I really want to try and make an orchid wall hanging...gonna follow through with some research and pricing first! It may be a pretty intense undertaking.

Succulents


Succulents or fat plants, are water-retaining plants adapted to arid climates or soil conditions. Succulent plants store water in their leaves, stems and also in roots.

So...I have some plants picked out and some ideas on where to put them...I'll update you more soon on the outcome. I just hit "order" on some cork bark and the necessary tools needed for the Orchid wall hanging!

What's making you look forward to spring?!

Thursday, February 24, 2011

Ana-White.com...how I love thee!

Quite simply.

I lurve Ana White.

She has SO many amazing designs on her Blog and she makes each and everyone look so...darn...easy.

Here are some of my favorites...i.e. ones I totally wanna make!

Rolling cubbies...between $20-$50...


The High Rise Shelf...for under $20...


The 5 Shelf...for under $20...


A Leaning Wall Shelf...for between $20-$50...


Truss Shelves...between $20-$50...


Aren't these great?! I can't wait to try some (or all) of them! I have been following her site for a while...after finding $10 shelves there. These puppies are going in my dining room...eventually!


I visited Ana's site today in hopes that she had a tutorial for making a chair similar to these (from Target).


I want some SO badly, but I do NOT like the $299+ price tag!! They can't be THAT hard to make right?!?! Well...I'll add it to the list...and until then...I'll practice my hand at furniture making thanks to Ana-White.com! :)

Interchangable Zipper Necklace

So, I have ONE more thing I can mark off my 30 Before 30 List! :)

I made my own necklace using this tutorial from Craftaholics Anonymous.


I didn't quite get all the pieces that I wanted for the project, but I like the way it turned out! Here's a few pics of how I did the project...first off, I didn't buy a premade necklace, although you can and then use the existing lobster clips to attach to the zipper base...I made my own necklace out of flat round mother of pearl beads.

First I drilled tiny holes in each of the beads...


Then I checked to make sure my rings fit...and they did...


Finished drilling all the holes...


Then I used my eyelet punch to make holes in the zipper ends...


Then I hammered in my eyelets. I used silver eyelets so they would show up a little better!


Then I just attached my rings and my new necklace with lobster clips.

I think it's super cute!


On to the next project!! :)
Pin It

Saturday, February 19, 2011

Recovering a Chair - A new wardrobe for my seat :)

Another thing I can mark off my 30 Before 30 List! Wahoooo! I mentioned yesterday that I finally finished painting my chair and bench for my recovering project.

Here is the final result!


Back in October I picked up this chair at Goodwill for $25 with Mom. I was pumped to recover it and use it in my Studio and for Photoshoots. I got him home and got all the fabric ripped off with Husby's help...


Once I got all the icky, nasty, old fabric off we headed outside to lightly sand and hit it with some white spray paint...


I brought it inside and tried my hand at some antiquing glaze...it did not go so well...so I nixed that idea!


And then...we had to do more work on the basement and my project got put on hold...straight through Christmas and New Years. I finally decided it was time to finish the project. It needed another coat of white paint after my antiquing debacle, and I decided to finish it off with a glossy coat.

Once it dried of course, now it was time to add my fabric and padding. I traced out the front piece using the cardboard from the original padding.


I used the same cardboard to wrap my fabric on for the back of the chair, then stapled it into place.


Then I added some extra padding between the back and the front and started stapling my front piece into place.


Wahh-laaaa. All done!
Well, at least the seat back portion!


Now for the seat itself. I decided I wanted some extra padding to go all the way down the front for those of us that are shot and didn't want to rest our legs against wood.


Once I cut the padding into place (which wasn't much cutting) then I covered it with my fabric and started pulling, tucking and stapling. It was alot easier than I thought it would be!


Finally...here I was at the last step. Time to add the trim.


Perfect! It makes it all come together!


Here is a close up of the trip. Crisp black. :)


And here is what the back looks like. There are a few paint chips that I will have to fix, but that's what happens when you give me an industrial stapler and a hammer.  :) Trust me...I have a few sore fingers that remember too.


And here she sits in her temporary home. Until the Studio is complete!


The two front legs were my only real trouble spots. And I tried my best with them. I even added some fabric brads to cover up all the tucking I had to do. It's not bad I guess.


And finally...the Before and After again...


I LOVE it...and I can't wait to use it!!
Pin It
Related Posts with Thumbnails