Here's a great little Valentine's Day project...we completed it at our Church's Chicks in Aprons class...and had a great time!
Here's what you'll need:
elt (any color) 10-12 sheets
Ribbon (to hang your decor)
Straight Pins/Dress Pins (250+)
Heart Shaped Styrofoam Heart (I know Hobby Lobby carries them)
Scissors
Your supplies should total around $14-16
Now, here's the HOW-TO
So I am gonna do a quick run down of the fastest way to cut out your circles, cause you are going to need A LOT of them!! First you want to cut your felt sheet in half...
Then cut it in half again...
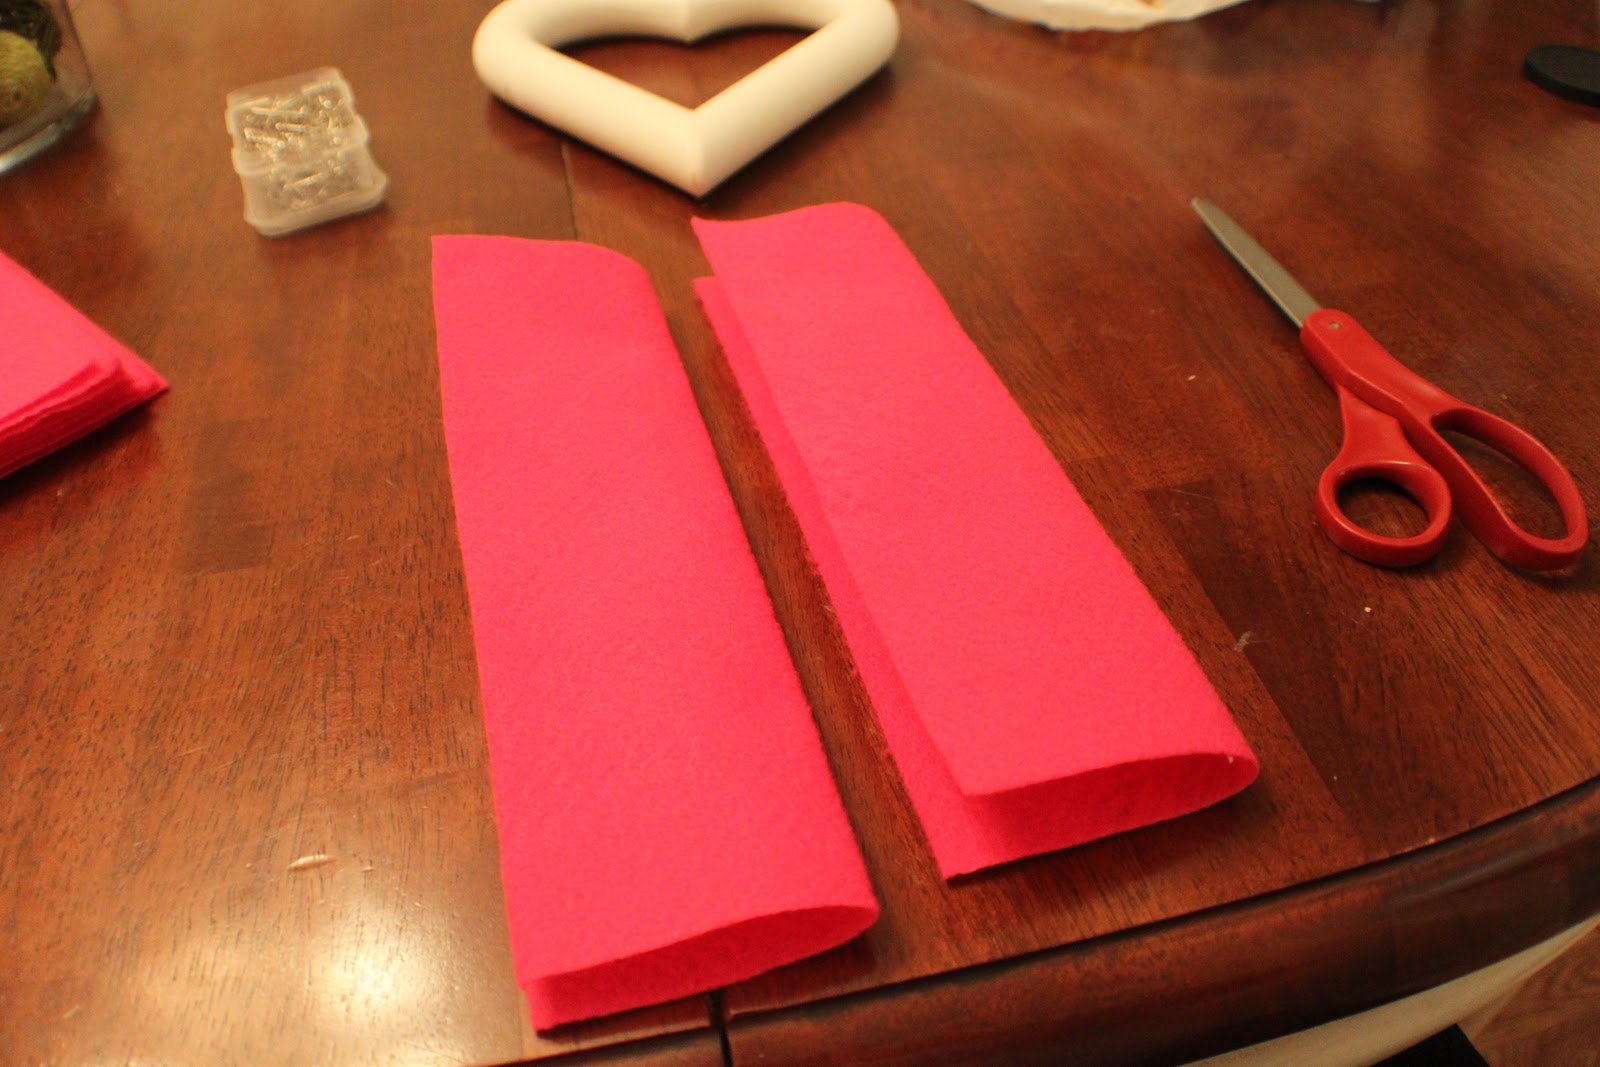
Then cut them in half...
You still with me? Now you should have about an inch to an inch and a half wide stripe that is 8 inches long. (estimated) Now you need to zig zag fold them...like this...
Now, cut off the corners forming a circle. You can cut a complete circle out if you want, whatever works for you. And no, your circles do not have to be perfect...
Now...grab your pins and your heart...it's time to start assembling this baby...
Take one circle and fold it in half...
Then in half again...till you have this little felty bundle...
Stick one pin through the point of your felt circle bundle and push it into your styrofoam heart...
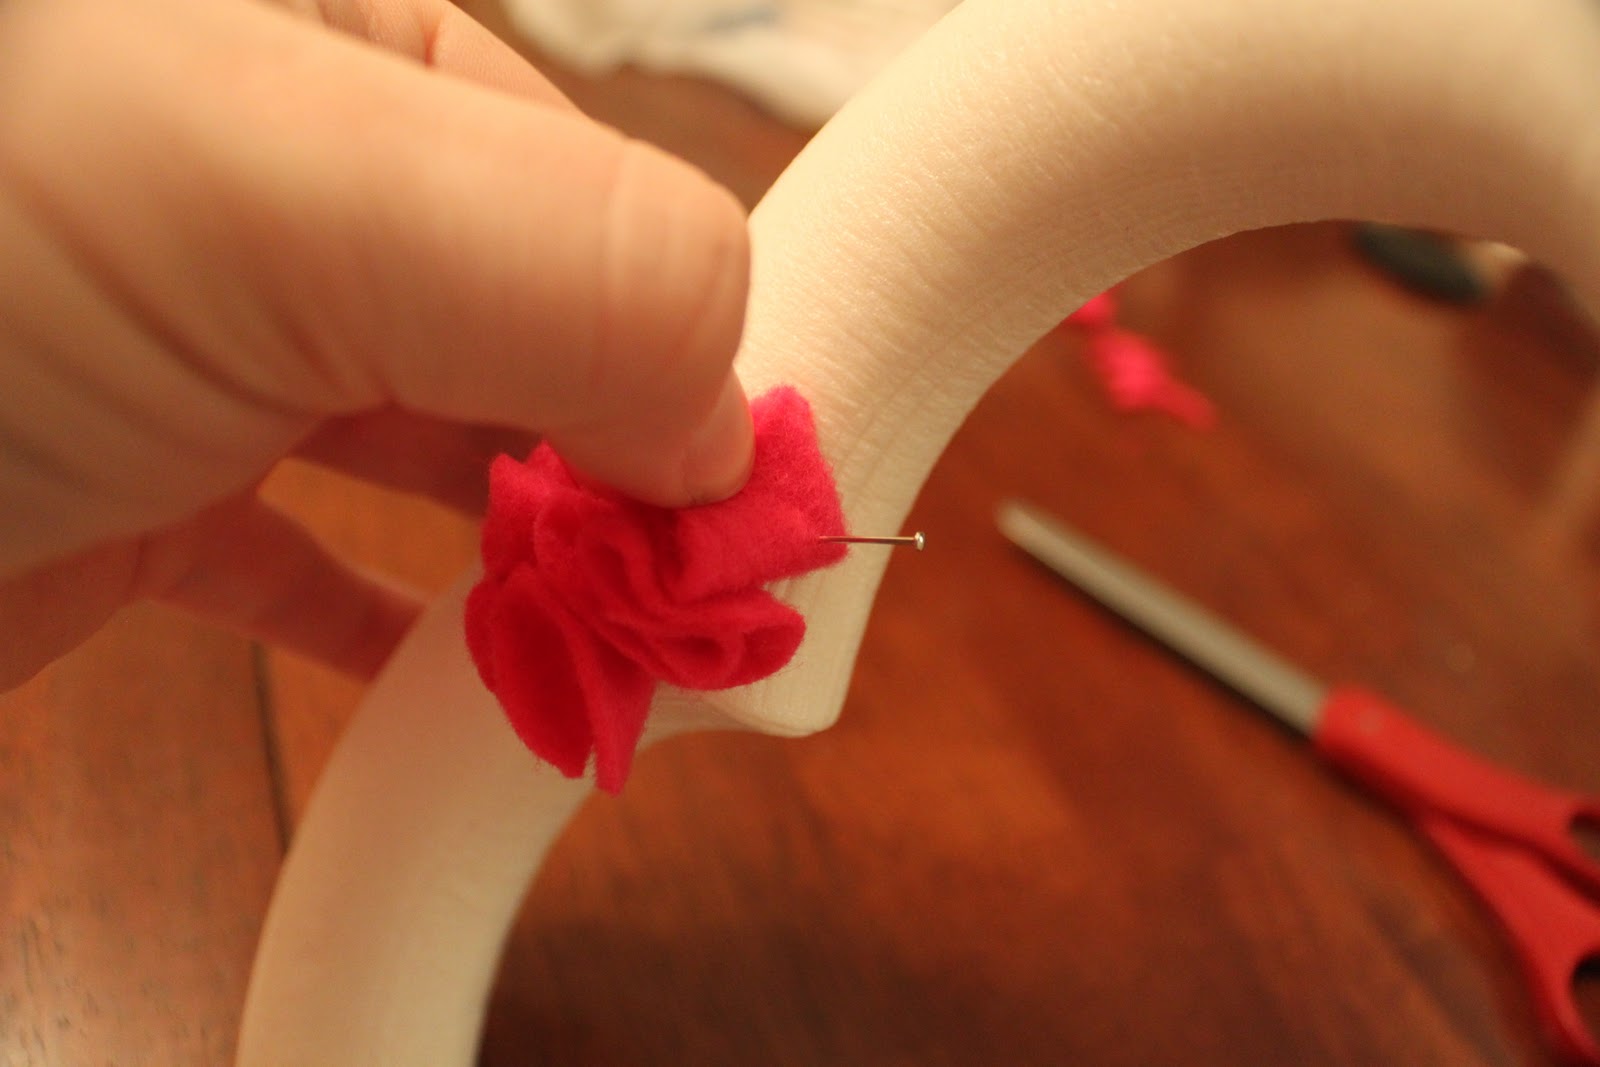
Pack them as tight or as loose as you desire...and keep folding, sticking and pushing...
No really, keep going...
And before long, you'll be DONE!!
It helps to have a little cutie-pah-tootie nearby to help show off the final result...and it's even better if she exclaims "oh I loooveee ittt aweeee" and gives it a hug. *adorable!*
Then you are complete. The adding the ribbon is pretty self-explainatory...I assume. Just cut the ribbon to desired length and stick it to the back of your heart with more pins.
*Note, your pointer and thumb finger will more than likely be numb at the tip by the end of this...but no one ever said crafting isn't hard work!!!*
Here's my finished product!
What kind of cutesy-heartsy things are you making for Lovey Day this year?
Showing posts with label Tutorials. Show all posts
Monday, February 07, 2011
Wednesday, January 26, 2011
Valentine's Day Crafts - Part 1
Valentine's Day is 20 days away; and it is a favorite in our house! So this year I just knew I had to whip up some fun Heart Day goodies.
I headed out to Target and picked up some cute Valentine's Day plates and a bowl to match. Then I hopped into JoAnn's to pick up a dowel and some Gorilla Glue.
When I got home, I laid out some paper on the table, snatched up some white paint (just the $.89 kind from any craft store) and painted my dowels that I had Husby help me cut down.
After two coats and letting them dry, I followed the directions with the Gorilla Glue and started attaching my dowels to the plates. This...turned into an ordeal. They most certainly did not want to stick. One dowel in fact fell at least 4 times. Arrrgggg. Just as I was beginning to get frustrated they stuck.
I have to admit though this process took about 2 hours, then right before bed we attached the top tier (the bowl) and went to bed. It fell once, it was fixed and then I went to bed again. Grrrrr.
But...when I got up this morning I met my new sweet little dessert tiered-tray.
Yeah, I know you see it too...the gunk...more on that in a sec...
I must point out one thing. This was the first time that I had used Gorilla Glue. Everyone raves about it and even after the minor topples of last night it seems to have the strength to really hold, however I am not pleased with the foamy hard gunk that I am left with. I'm not sure if that means that I used too much...but I just know that I will have to try and get some of that off.
Isn't it just the cutest! And I saved on making my own! You see Target does sell it's own tray using some of these plates...but it was $9.99 and I just knew that I could make it cheaper. And I did.
Here's the cost breakdown: I got many of these on clearance...whoo hoo! How lucky!? I'm not counting the cost of the Gorilla Glue (which was $5.99, $3.59 with a 40% off coupon, which I used!!), it will lend me a hand in many projects to come.
At Target:
I headed out to Target and picked up some cute Valentine's Day plates and a bowl to match. Then I hopped into JoAnn's to pick up a dowel and some Gorilla Glue.
When I got home, I laid out some paper on the table, snatched up some white paint (just the $.89 kind from any craft store) and painted my dowels that I had Husby help me cut down.
After two coats and letting them dry, I followed the directions with the Gorilla Glue and started attaching my dowels to the plates. This...turned into an ordeal. They most certainly did not want to stick. One dowel in fact fell at least 4 times. Arrrgggg. Just as I was beginning to get frustrated they stuck.
I have to admit though this process took about 2 hours, then right before bed we attached the top tier (the bowl) and went to bed. It fell once, it was fixed and then I went to bed again. Grrrrr.
But...when I got up this morning I met my new sweet little dessert tiered-tray.
I loved it! I can't wait to bake some yummy "low point" goodies for small group next week and share them on my new tray!
Yeah, I know you see it too...the gunk...more on that in a sec...
I must point out one thing. This was the first time that I had used Gorilla Glue. Everyone raves about it and even after the minor topples of last night it seems to have the strength to really hold, however I am not pleased with the foamy hard gunk that I am left with. I'm not sure if that means that I used too much...but I just know that I will have to try and get some of that off.
Isn't it just the cutest! And I saved on making my own! You see Target does sell it's own tray using some of these plates...but it was $9.99 and I just knew that I could make it cheaper. And I did.
Here's the cost breakdown: I got many of these on clearance...whoo hoo! How lucky!? I'm not counting the cost of the Gorilla Glue (which was $5.99, $3.59 with a 40% off coupon, which I used!!), it will lend me a hand in many projects to come.
At Target:
Pink Heart Bowl $1.50 (regularly $2.49)
Red Dot Plate $1.25 (regularly $1.79)
White Heart Plate $1.25 ($1.99)
At JoAnn's Crafts:
Wooden Dowel $.89
Total $4.89
Good enough for a quick little cute project! And I figure you can do this little project for any Holiday! Target always has the cutest holiday plates available! I will however be looking for something cuter to go in place of the wooden dowels.
I know many other people/bloggers have done something similar, so I knew I just needed to try it too! So what do you think of the little project?
Keep your eye out...more to come!
Friday, January 07, 2011
Silhouette Dogs - Using the Silhouette Cutter and Laminate Chips
I got some random idea the other day...super random...but super cute! So I found some laminate counter sample tiles in the trash at work...and don't you even think it..trashdigger!!! Yes, I stuck my hand in the trash to grab them; but it only had paper and other samples in it...so no worries.
Anywho. I decided I was going to try to put my Silhouette SD cutter to use with a different project. It would help be build a template for a silhouette of my pups!! Then I would make some nameplates for their crates....I know right, how cute?!
So this post is super picture heavy, but enjoy my lame attempt at a tutorial :)
First, I took pictures of both dogs. (even though you will only see Olive spotlighted in this post, they each got a nameplate!) I had to tease them with treats to get them to face the right direction to get that person profile, silhouette shot.
Gosh, she's cute...
Then I headed to Photoshop Elements...and I used the "magnetic lasso" tool to cut Olive's profile shot...
Then I took it and dragged it into a new blank file. I drew a black box over Olive's picture.
Then I hit "CTRL + g" and waallaaa up popped Olive's wittle head. Still so cute.
It should look like this...
Now...it's time to open up the Silhouette SD Studio...one of my new favorite places on Hattie Pearl. (that's my lappytop.)
There are many times that angel start singing simultaneously with programs or things happening on my Hattie...this is one of them... :)
Import your picture into your Library. Then import your picture from the Library and then resize it to the desired size.
Now, it's time to trace the image; this tells the Silhouette where to cut! So hit the "trace" button, select the area to be traced and choose "trace outer edge."
Before you move on, load your paper and cutting mat into the Silhouette. I haven't given her a name yet, I need to work on that...she's a beaut too, even though our relationship had a rough start! :/
Now it's time to cut...
And here is the finished results...
Then it was off to thebat man cave to do a little tool work. As always safety first...I put on my high school chemistry class safety goggles and got ready to cut using our Dremel tool...
Gosh, that was not a cute picture.... haha!
I took my mono adhesive and lightly glued the silhouette cut-out onto my laminate tile.
I traced the cut-out with pencil...
Does this look scary or what? Luckily we still had the manual for the Dremel, so I looked up what the best attachments to use would be...and then I went to the mecca of attachments...oy.
I used a clamp to attach my tile to the table for stability...
And I started cutting out...I wasn't very good at it at first, so it was smart of me to start in the middle because I had a few hops, skips and jumps in the beginning.
So there you have it...the completed project.
Here it is with the original cut-out...not too shabby.
I then took some pretty rosey-pink colored paper and glued it to the back of the tile...
And I headed back to Silhouette Studio to cute the letters for the name on the nameplate. I used "suede" as the font. Again, yes I know...it's a favorite! (Download it here.)
Once it was cut, I glued it to the tile and it was all ready to go!!
I asked Olive what she thought about it...she sniffed it...but didn't seem to care too much.
I went into the office, where we keep the crates and started attaching the nameplate with fishing wire. Olive came in and guarded me while I worked. She's sweet, huh?!
And it's DONE...I lurveee it!
So, I hope that you enjoyed my tutorial or at least the photos... :) I had a blast making it and I LOVE the result!
Pin It
Anywho. I decided I was going to try to put my Silhouette SD cutter to use with a different project. It would help be build a template for a silhouette of my pups!! Then I would make some nameplates for their crates....I know right, how cute?!
So this post is super picture heavy, but enjoy my lame attempt at a tutorial :)
First, I took pictures of both dogs. (even though you will only see Olive spotlighted in this post, they each got a nameplate!) I had to tease them with treats to get them to face the right direction to get that person profile, silhouette shot.
Gosh, she's cute...
Then I headed to Photoshop Elements...and I used the "magnetic lasso" tool to cut Olive's profile shot...
Then I took it and dragged it into a new blank file. I drew a black box over Olive's picture.
Then I hit "CTRL + g" and waallaaa up popped Olive's wittle head. Still so cute.
It should look like this...
Now...it's time to open up the Silhouette SD Studio...one of my new favorite places on Hattie Pearl. (that's my lappytop.)
There are many times that angel start singing simultaneously with programs or things happening on my Hattie...this is one of them... :)
Import your picture into your Library. Then import your picture from the Library and then resize it to the desired size.
Now, it's time to trace the image; this tells the Silhouette where to cut! So hit the "trace" button, select the area to be traced and choose "trace outer edge."
Before you move on, load your paper and cutting mat into the Silhouette. I haven't given her a name yet, I need to work on that...she's a beaut too, even though our relationship had a rough start! :/
Now it's time to cut...
And here is the finished results...
Then it was off to the
Gosh, that was not a cute picture.... haha!
I took my mono adhesive and lightly glued the silhouette cut-out onto my laminate tile.
I traced the cut-out with pencil...
Does this look scary or what? Luckily we still had the manual for the Dremel, so I looked up what the best attachments to use would be...and then I went to the mecca of attachments...oy.
I used a clamp to attach my tile to the table for stability...
And I started cutting out...I wasn't very good at it at first, so it was smart of me to start in the middle because I had a few hops, skips and jumps in the beginning.
So there you have it...the completed project.
Here it is with the original cut-out...not too shabby.
I then took some pretty rosey-pink colored paper and glued it to the back of the tile...
And I headed back to Silhouette Studio to cute the letters for the name on the nameplate. I used "suede" as the font. Again, yes I know...it's a favorite! (Download it here.)
Once it was cut, I glued it to the tile and it was all ready to go!!
I asked Olive what she thought about it...she sniffed it...but didn't seem to care too much.
I went into the office, where we keep the crates and started attaching the nameplate with fishing wire. Olive came in and guarded me while I worked. She's sweet, huh?!
And it's DONE...I lurveee it!
So, I hope that you enjoyed my tutorial or at least the photos... :) I had a blast making it and I LOVE the result!
Saturday, November 06, 2010
Thinkin' about...
whippin' up one of these cute lil' babies for my front door!! :P
Adorable much?
And...
I know right?!?!
LOVE IT!! Thanks to Tatertots and Jello for sharing the idea and Tutorial from See Life through the Lens!!
Adorable much?
And...
I know right?!?!
LOVE IT!! Thanks to Tatertots and Jello for sharing the idea and Tutorial from See Life through the Lens!!
Subscribe to:
Posts (Atom)