I figured that after having so many people ask how I do certain things on the Blog...I would do a little running series with the Blogger tips and tricks I have learned over time.
I figured I would start with one of my most recently learned tricks.
Adding a favicon to my blog.
What's a favicon you ask?
Well, take a look...
I figured I would start with one of my most recently learned tricks.
Adding a favicon to my blog.
What's a favicon you ask?
Well, take a look...

All the orange arrows are pointing to favicons.
I created this little smiley to be my favicon for the blog...you should see it next to my blog address on the URL toolbar above.
...and here is a quick tutorial on how you can create your very own favicon!
 Choose/Create your Favicon
 Add favicon HTML code to your Blogger template.

 Paste in your favicon HTML code and image location.
Now you can enjoy your very own favicon on your blog. It may take about an hour to show up (mine did).
If you have any questions, feel free to contact me!
 Choose/Create your Favicon
- Choose your favicon or create one. You can use any picture or symbol. Just remember, it isn't going to be very big so you want it to be recognizable at the small size it will be when it is complete.
- You can create your own favicon, like I did (using photoshop or publisher, any picture program really) or you can find favicons on the internet...just do a google search for free favicons!
- Once you have a .jpg or .jpeg file of your favicon created or saved, you must now upload it to a photo/file hosting site such as photobucket. (that's what I use)
 Add favicon HTML code to your Blogger template.
- For those of you who run when you hear or see HTML, don't be afraid. It's not as scary as it seems.
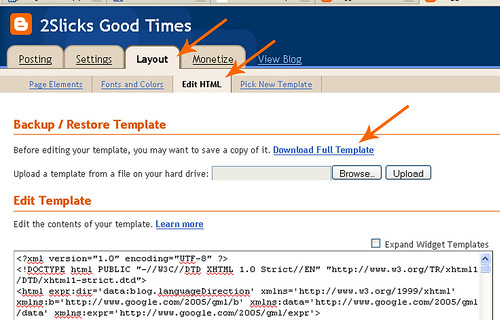
- First you want to go to your "Layout" tab. Then go to "Edit HTML." Once there, you should click "Download full template." This will create a backup file of your current template, in case any code gets messed up in the process. You can then import this file in to start over and not lose any of your current template.

- Now you want to go to "Edit" and "Find."

- Copy and paste in the following code to search and hit "next"
- Now that code will be highlighted on your Blogger template.
 Paste in your favicon HTML code and image location.
- Now you want to paste the following code AFTER the above code from Step 2.
- Now, where it says "ICON FILE URL" you want to paste the "Direct Link code" from Photobucket or your file hosting site.
- Paste that "direct link" code on both lines.
- Now you want to scroll down on your Blogger Template and "Save Template."
Now you can enjoy your very own favicon on your blog. It may take about an hour to show up (mine did).
If you have any questions, feel free to contact me!


